Holiday Sparkle

Hello friends,

Another Christmas card for the new challenge at The Shabby Tea Room. The theme for this fortnight is “Holiday Sparkle” and this week’s winner will receive a $10 gift certificate to spend at the Dies R Us store. What an awesome prize!

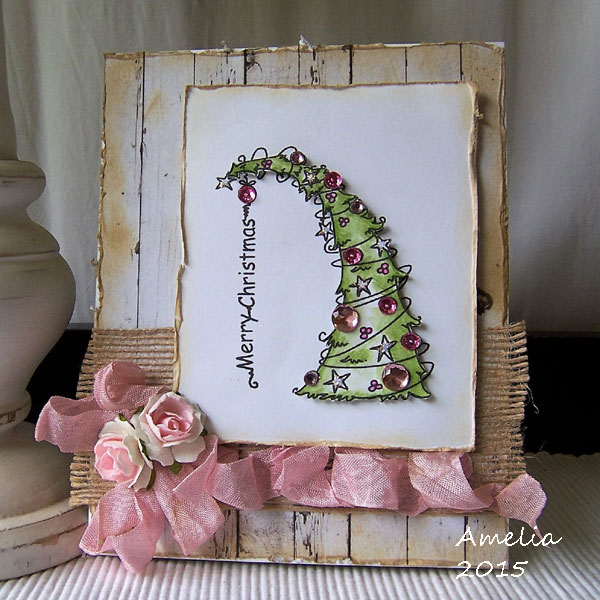
I used the lovely shabby pink and silver colors in the photo as inspiration for my card. I just love pink Christmas cards! The Christmas tree is cut with a Memory Box die  and layered the tree on a pink triangle to provide a sturdy base for the “decorations”. I added my favorite pink roses, silver gemstones, stars and cord to create the sparkle on the tree. For the background I used rose paper and a piece of vintage lace. The sentiment is cut with a Paper Smooches Christmas Words die. There are beautiful cards from the design team at The Shabby Tea Room blog and a visit  to see them will be  worthwhile.

I entered my card in the following challenges:

ShabbyTree

A close-up of the Christmas tree

ShabbyTree1

The flowers

ShabbyTree2

The sentiment in silver

ShabbyTree3

A peep at the inside

ShabbyTree4

Project details:

  • Cream, silver and pink cardstock
  • Memory Box die “Snowflake Tree” No. 98405
  • Paper Smooches “Christmas Words” OCD087
  • Lace
  • Silver gemstones, stars and cord
  • Paper roses
  • Tim Holtz distress ink “Antique Linen”

Have a great day and thanks for stopping by. I enjoy reading all your comments and they are much appreciated.

Regards,

Amelia

O’ Christmas Tree

Hello friends,

November is here  … and Christmas is coming soon. I have my first Christmas card for this year to share today. The card was created for the new challenge at The Shabby Tea Room and the theme for this fortnight is “O’ Christmas Tree”. Our sponsor is Bugaboo stamps and you could be the winner of 7 Bugaboo digi stamps by just playing along. A visit to The Shabby Tea Room for the inspiration picture and more info on the prize and rules will be worthwhile.

For my card I used a Bugaboo stamp “Merry Christmas Tree”  so kindly sponsored by Jodie. As the Christmas tree is so cute with the pink gem stones and glitter as decorations I decided to keep the rest of the card clean and simply. To capture the rustic and shabby look of the inspiration picture, I layered the image on a wooden plank background, add a strip of burlap, some vintage seam binding and pink roses. The distressed edges adds a perfectly aged, weathered look. Hope you like my take on a non-traditional Christmas card.

Challenges:

ChristmasTree

A close up of the Christmas tree

ChristmasTree1

The flowers and ribbon

ChristmasTree2

A peep at the inside

ChristamsTree3

Project details:

  • White cardstock
  • Wooden plank designer paper
  • Bugaboo stamp “Merry Christmas Tree”
  • Pink gem stones in various sizes
  • Skwiglues glitter
  • Derwent Inktense pencils for coloring
  • Hug Snug seam binding “Pink Tulip”
  • Roses
  • Tim Holtz distress inks “Antique Linen”

I love having you stop by, thank you for visiting! Have a wonderful day and happy crafting.

Regards,

Amelia

Thankful

Hi there and welcome!

A card to share for the new challenge at The Shabby Tea Room. The theme for our challenge this time is “Thankful” with a beautiful photo for inspiration. You are welcome to submit any type of project and remember only our name is ‘shabby’, your design need not be! Our sponsor for this challenge is Great Impressions Rubber Stamps , but for more information hop over to The Shabby Tea Room.

For my card I used a stamp from Impression Obsession to create the wooden planks for the background .Taking inspiration from the photo, I used the autumn colors and also burlap and cord. I’ve used several different dies on this card for the embellishments and listed them in my project details. I added some flourishes, leaves, butterflies and roses in shades of brown. The sentiment is from a Sizzix stamp and Framelits die set and the lovely window die from Spellbinders. Hope this card will inspire you to create something for our challenge!

Challenges:

Autumn

The window

Autumn1

The sentiment and tag

Autumn2

A close-up of the roses and leaves

Autumn3

A peep at the inside

Autumn4

Project details:

  • Cream and brown card-stock
  • Prima designer paper “Romantique”
  • Impression Obsession cover-a-card background stamp “Wooden Plank” (CC177)
  • Impression Obsession die “Leaves” (DIE095-D)
  • Spellbinders Shapeabilities die D-Lites “Window Two” (S2-016)
  • Spellbinders die D-Lites “Flutter Love” (S3-211)
  • Marianne Design Creatables “Flourishes” (LR0271)
  • Sizzix Stamp and Framelits die set “Tags and sentiments” (659100)
  • Tim Holtz distress inks “Vintage photo” and “Walnut Stain”
  • Burlap
  • Roses
  • Wax cord
  • Skwiglues “Crystal”
  • Pearls

Thanks for stopping by and your comment is much appreciated! Have a wonderful week and happy crafting.

Kind regards,

Amelia

Autumn Leaves

Hello friends,

I hope you are all doing well. Today’s post is about the new challenge at The Shabby Tea Room with the theme “Colors and Patterns”. You can create a card or project inspired by the photo on The Shabby Tea Room blog. Our sponsor is My Artistic Adventures and you may be the winner of  a $18 voucher at Heather’s Etsy shop!

One of the many things I love are autumn colors – the browns, oranges, reds and yellows are so warm and earthy. I chose a beautiful vintage Thanksgiving autumn collage sheet from My Artistic Adventures to create my card. The lovely papers were embellished with a vintage birdcage, leaves, lace and a few sequins. The leaves are die cut with and Impression Obsession  die and colored with distress inks to match the colors of the background papers.The birdcage is from Cottage Cutz “Fancy Ornate Birdcage” and one of my favorite dies. Although it is summer in my part of the world I hope you’re all enjoying a beautiful fall in the Northern Hemisphere.

Challenges I entered:

ThanksgivingA

A close-up of the fancy birdcage

Thanksgiving1

The leaves and sentiment

Thanksgiving2

A peep at the inside

Thanksgiving3

Project details:

Thank you for your visits and sweet comments! Hope you’re ready to play along with our challenge at The Shabby Tea Room. Have a wonderful day.

Regards,

Amelia

Pretty in Purple

Hello friends,

It’s Monday and time for a new challenge at The Shabby Tea Room! Our challenge is called ‘BOO-riffic” and you can create a card or any project inspired by the inspiration photo on The Shabby Tea Room blog. The sponsor is Paper Sweeties and the winner will receive a $20 gift certificate from the Paper Sweeties boutique!

I’ve got something created in purple and black to share for this challenge – lace, pearls and lots of stamped roses. This is some of my favorite things to use on cards. The stamped roses, leaves and sentiment are from the Paper Sweeties Party Time bundle (stamps and dies set) & “You make Me Smile” sentiment set. Hope you’ll allow yourself some time to play along this fortnight at The Shabby Tea Room.

Challenges:

PS_Rose

The sentiment

PS_Rose1

A close-up of the roses and leaves

PS_Rose2

A peep at the inside

PS_Rose3

Project details:

  • White and black card-stock
  • Designer paper in purple and black (Unknown)
  • Paper Sweeties : Party Time bundle & “You make Me Smile” sentiment
  • Spellbinders Shapeabilities die D-Lites “Frame One”
  • Derwent Inktense water-color pencils
  • Lace
  • Washi Tape
  • Pearls
  • Hug Snug seam binding “Sky Mauve”

Thanks for visiting! Have a wonderful day and happy crafting.

Regards,

Amelia

Sweetest Little House …

Hello friends,

Not a card from me today but a cute little 3D house treat box. It was great fun making something different for a change. My project was designed for the new challenge at The Shabby Tea Room starting today. The challenge theme is “Swirls and Twirls” and using the inspiration photo on The Shabby Tea Room blog. This challenge is sponsored by The Cutting Cafe and you could be the lucky winner of a  credit to the store!

As Halloween is not a well-known event in South Africa I decided to use the colors of the inspiration photo to create my treat box. The 3D House Box set is kindly sponsored by The Cutting Cafe. It took time to assemble all the pieces and to decorate, but the when finished it is the sweetest little house! To enjoy whats inside the treat box you just lift the roof on the chimney’s side to see all the delicious toffees, chocolates and candy.

Entering the following challenges:

TreatBoxHouse

The back of the house decorated with a heart-shaped button

TreatBoxHouse5

The sentiment hanging from the chimney

TreatBoxHouse1

Flowers on the roof

TreatBoxHouse2

The front  with roses, a heart-shaped button on the front door and lace

TreatBoxHouse3

View from a different angle

TreatBoxHouse4

A peep inside, filled with yummy treats

TreatBoxHouse6

Project details:

  • White card stock for base
  • Black card stock for embellishments
  • Designer paper “My Mind”s Eye”, “Authentique” and “Graphic45”
  • The Cutting Cafe 3D House set template
  • Roses and blossoms
  • Martha Stewart punch “Arch Lattice”
  • Heart-shaped buttons
  • Lace
  • Wax cord

Thanks for your visit! The Shabby Tea Room blog is full of inspiration for this challenge, so be sure to treat yourself with a visit there. I’d love to see what you create!

 Kind regards,
Amelia

Previous Older Entries